Skip to content

IW5EDI Simone – Ham-Radio

Amateur Radio made in Italy

Menu
  • About me
    • QSL info
    • Log Book OnLine
    • What I Hear
    • Live Stream
    • Perchè (Why) in English ?
    • Contact me
    • Privacy info
  • Software
    • Ham Radio Deluxe 5.2
    • IP-Sound
    • OscillometerXZ
    • YO Yagi Optimizer
    • HamAlyzer 2.8
    • ERP Calculator
    • 59+ software
    • Magnetic Loop Calculator
    • MeterMate
    • UDY 2 Voice Keyer
  • Ham Radio
    • Beginners Guide to Ham Radio
    • Direct QSLing from Italy
    • Foreign Ham Operations in Italy
    • Tourist Ham Radio in Italy
    • Frequency List
    • Metric Conversion Table
    • Sound Card Interfacing for RTTY, PSK31, and SSTV
  • Technical Articles
    • Microphone Connections
    • A low cost 600 watt ultra-linear amplifier
    • VE7AVV – YAESU FL-2100Z Amplifier Repairs
    • Mic Wiring – Ham Radio
    • Homebrewing a balun
    • Grounding Concepts
    • HF Scanning frequencies
    • Wi-FI: Measuring network throughput
    • Determining RFI problems in mobile
    • Hidden and stealth antennas
  • Antennas
    • 144 / 430 Dual Band J-pole antenna
    • 10 Meter 4 Element Quad Antenna
    • 144 Mhz Magnetic Loop Antenna
    • A “loopy” Loop Loaded Vertical
    • W5GI Mystery Antenna
    • A Multiband Dipole
    • Build a W3DZZ Antenna
    • A portable 2-element VHF yagi
    • Assembling GAP Titan DX Antenna
    • The Galaxy Dipole
    • Pfeiffer Maltese Quad Antenna System
    • Magic Anti-Jamming antenna
    • D3+ High Performance Antennas
    • EH Antenna for 40 and 20 meters
    • Homebrew G5RV
    • 40 meter mini Moxon Antenna
    • EH Antenna for 10 meter
    • Quad and ModQuad Antenna
    • Inverted U antenna for 160 meters
    • 6 Band HF Windom antenna
    • The Bazooka Antenna
    • Antennas for HF mobile operation
    • Inverted L Antenna for Low Bands
    • Your first dipole
    • Remote control Antenna Switch
    • The gin pole
    • Hexbeam antenna setup
    • W4TI Rotor Installation
Menu

Boomless Quad

Posted on April 29, 2020April 29, 2020 by Simone

A Quad antenna is a full wavelength conductor in the form of a square (or circle or diamond). It is actually two half wave dipoles spaced half wave length apart, bent at right angles at l/8th wavelength points and joined together.

If the Quad is fed at either sides it is vertically polar­ized and if fed at bottom or top it is horizontally polar­ized. The radiation will be perpendicular to the plane of the Quad. In this design a single feeder is used for all the bands, viz., 28 MHz, 21 MHz and 14 MHz.

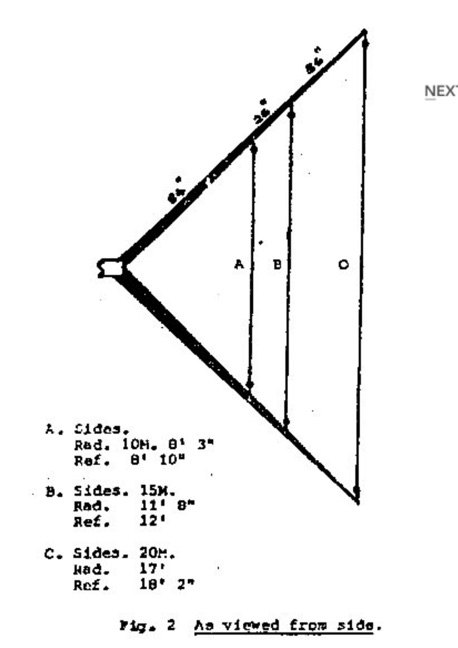
The dimensions are the ones suggested in the Janu­ary 1982 issue of QST, but the centre section design is altered to enable the quad to be rotated on the vertical as well as horizontal axis, so that the whole installa­tion may be carried out easily.

A telescoping mast is suggested so that the complete installation may be done with the centre section at about ten feet level. This will clear the spreader touch­ing the ground, while it is rotated on the horizontal axis during installation.

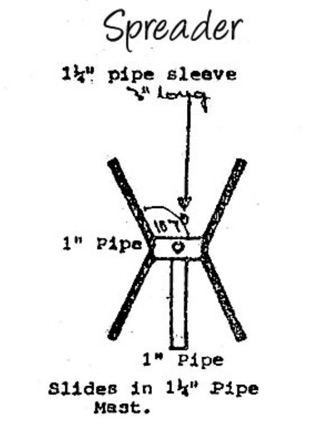
Eight 14 feet long good, strong and straight bamboos have to be selected and given two coats of waterproof varnish. The tie points of the elements on each bam­boo will be marked as shown in the sketch. One per­son standing on the ground can hold the bamboo to the angles with suitable hose clamps or any other clamps that may be available. I have used old motor cycle chains for this purpose and find it most efficient since it clamps the bamboo quite tight and does not allow it to slip down. The centre section is rotated on the horizontal axis and all the bamboo spreaders are clamped in a similar manner.

Now nylon guys are fixed between the spreaders (ra­diators and reflectors) as shown. A hook may be fixed at the centre of each guy. This will be unhooked while rotating the Quad horizontally to clear the mast and hooked back again. After fixing all guys as shown in the sketch, the copper wire could be strung.

Copper wire, preferably 14 swg or stranded – insulated wire may be used.

The elements have to be cut to the full length as shown, plus 3 inches for each egg insula­tor and termination points (i.e., 6 points about 18 inches). This is passed through the egg insulator up to the appropriate point, given a twist and soldered at the twist. Nylon string, about 18 inches long is strung through the other end of each insulator to bo tied to the appropriate points on the bamboo already marked.

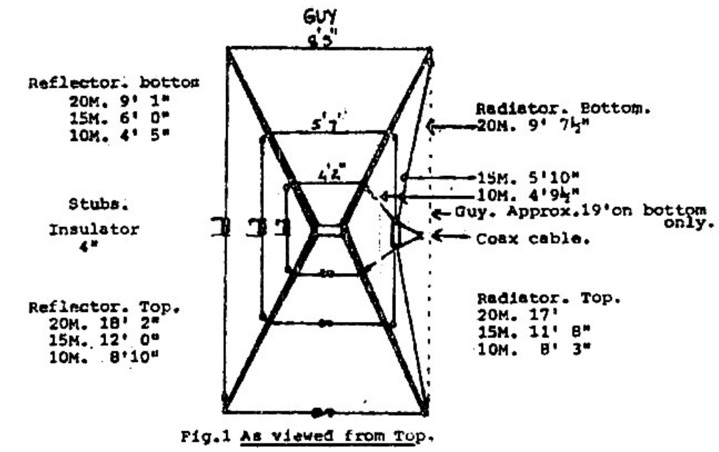
All reflector elements terminate on a 4 inch insulator (if this is not available, two egg insulators may be used 4 inches apart). Stubs, about 9 inches long are soldered on either end of these insulators for tuning purposes.

All radiator elements terminate on either end of a 4 inch insulator at the centre of the 21 MHz element- so this 21 MHz element may be fixed first and the other two 28 MHz and 14 MHz elements may be fixed later, terminate at the same 21 MHz parts.

Tie the radiator elements to the bamboo spreaders standing on the ground, by rotating them on the hori­zontal axis so that all the spreaders can be reached, one after another. The horizontal axis is locked after this process is over.

With the centre section raised to about 10 feet, the bot­tom wire of the 14 MHz radiator will be about 1-2 feet from ground level. Each radiator may be tuned indi­vidually for best front to back ratio. Finally the com­plete quad may be raised to optimum height.

Copyrights VU2GX Girimajij 

Leave a Reply

Your email address will not be published. Required fields are marked *

This site uses Akismet to reduce spam. Learn how your comment data is processed.

IW5EDI Simone

  • Licensed Amateur Radio operator in 1996 as IW5EDI, active member of ARI Firenze and ARRL
  • Class 1970, married with two childrens, love experimenting and antenna home-brewing. IT System Engineer, recently started having fun with morse code and Raspberry Pi


IW5EDI Simone


This Blog is mainly dedicated to Amateur Radio (Ham radio) and contains external articles and personal esperiences.

What is Amateur Radio ?
More Ham Radio Links


Blogroll

  • ARI Italian Amateur Radio Society 0
  • ARI Firenze ARI – Sezione di Firenze 0
  • ARRL Amateur Radio Relay League 0
  • DX Zone Ham Radio Internet Guide 0
  • DXSummit 0
  • DXWatch 0
  • eHam 0
  • Ham Radio Daily Ham Radio News 0
  • IW5EDI on QRZ.com My page on QRZ.com 0
  • Long Delayed Echoes 0

My Content

  • Antenna Projects 0
  • RadioAnnunci.it Mercatino Radioamatoriale 0

Categories

  • Articles (131)
    • Antenna Theory (13)
    • DXing (2)
    • How to (10)
    • shortwave (7)
  • Company and Products (1)
  • DXing (13)
    • QSLing (4)
  • Equipment (97)
    • Antenna (65)
    • Software Defined Radio (6)
  • Featured (28)
  • Ham Radio Events (25)
  • Ham Radio News (1)
  • Ham Radio Software (26)
  • HamRadio (94)
    • Ham Radio 2.0 (16)
    • How to (6)
    • Radio Scanning (6)
  • Homebrew (142)
    • HF Antennas (78)
    • Raspberry Pi (1)
    • UHF Antenna (16)
    • VHF Antennas (38)
  • Photos (4)
  • Short News (4)
  • Video (4)

Comments

  • Charles Mintoff on Ham Radio 2012
  • Roger Sparks, W7WKB on Petlowany Antennas by K6NO
  • Frank Barnes on Ameritron AL-80A restoration project
  • ken m3zkb on W5GI Mystery Antenna
  • Bobby on 5/8 Vertical Ground Plane antenna for 10 meters

RSS The DXZone.com

  • Top Amateur Radio Websites - Issue 2603
  • FT2: New Ultra-Fast Digital Mode Tested on HF
  • Top Amateur Radio Websites - Issue 2602
  • The G3LZR Tribander : The charm of the Impossible Antenna
  • Top Amateur Radio Websites - Issue 2601
  • Amateur Radio Clubs
  • Shrunken Quad
  • DIY Magnetic Loop Antenna Tutorial with Remote Tuning System
  • HF Beacon Tracker: Real-Time 3D Propagation Visualization
  • WSJT-X FT2 fork Decodium

Ham Radio Blog – IW5EDI Simone JN53OR

© 2026 IW5EDI Simone – Ham-Radio | Powered by Superbs Personal Blog theme