Skip to content

IW5EDI Simone – Ham-Radio

Amateur Radio made in Italy

Menu
  • About me
    • QSL info
    • Log Book OnLine
    • What I Hear
    • Live Stream
    • Perchè (Why) in English ?
    • Contact me
    • Privacy info
  • Software
    • Ham Radio Deluxe 5.2
    • IP-Sound
    • OscillometerXZ
    • YO Yagi Optimizer
    • HamAlyzer 2.8
    • ERP Calculator
    • 59+ software
    • Magnetic Loop Calculator
    • MeterMate
    • UDY 2 Voice Keyer
  • Ham Radio
    • Beginners Guide to Ham Radio
    • Direct QSLing from Italy
    • Foreign Ham Operations in Italy
    • Tourist Ham Radio in Italy
    • Frequency List
    • Metric Conversion Table
    • Sound Card Interfacing for RTTY, PSK31, and SSTV
  • Technical Articles
    • Microphone Connections
    • A low cost 600 watt ultra-linear amplifier
    • VE7AVV – YAESU FL-2100Z Amplifier Repairs
    • Mic Wiring – Ham Radio
    • Homebrewing a balun
    • Grounding Concepts
    • HF Scanning frequencies
    • Wi-FI: Measuring network throughput
    • Determining RFI problems in mobile
    • Hidden and stealth antennas
  • Antennas
    • 144 / 430 Dual Band J-pole antenna
    • 10 Meter 4 Element Quad Antenna
    • 144 Mhz Magnetic Loop Antenna
    • A “loopy” Loop Loaded Vertical
    • W5GI Mystery Antenna
    • A Multiband Dipole
    • Build a W3DZZ Antenna
    • A portable 2-element VHF yagi
    • Assembling GAP Titan DX Antenna
    • The Galaxy Dipole
    • Pfeiffer Maltese Quad Antenna System
    • Magic Anti-Jamming antenna
    • D3+ High Performance Antennas
    • EH Antenna for 40 and 20 meters
    • Homebrew G5RV
    • 40 meter mini Moxon Antenna
    • EH Antenna for 10 meter
    • Quad and ModQuad Antenna
    • Inverted U antenna for 160 meters
    • 6 Band HF Windom antenna
    • The Bazooka Antenna
    • Antennas for HF mobile operation
    • Inverted L Antenna for Low Bands
    • Your first dipole
    • Remote control Antenna Switch
    • The gin pole
    • Hexbeam antenna setup
    • W4TI Rotor Installation
Menu

Build a Motor Driven Magnetic Loop Antenna

Posted on February 27, 2015 by Simone

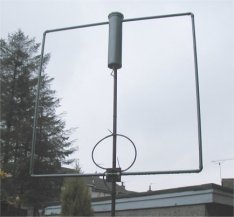
Build a Motor Driven Magnetic Loop Antenna 1.5 Meters Square for 3.5-10MHZ

By Neil Lowson, GM4XRF

Parts List:image001

  • 4 1.5 mtrs 22mm copper pipe
  • 4 22mm copper 90 degree bends
  • 1 500pf 6kv capacitor
  • 1 12 volt 4 RPM geared motor
  • 2 flexible couplings
  • 1 insulated if possible
  • 1 6-1 or 10-1 reduction gear
  • 2 small micro switches
  • 1 5 pin SIN SKT@plug
  • 1 400mm 4”plastic pipe
  • 1 4”plug insert for bottom of pipe they have a rubber seal on (B)
  • 1 4”seal for top this a screwed on cover for access to the capacitor (A)
  • 1 60mm *350mm *4mm paxolin for motor/capacitor
  • 1 75*75 4mm paxolin plate for fixing mast to loop at bottom with saddles
  • 2 12volt leds 1green 1 redimage003
  • 1 25mm PVC coupling
  • 1 25mm broom handle

Getting Started: 
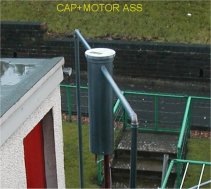
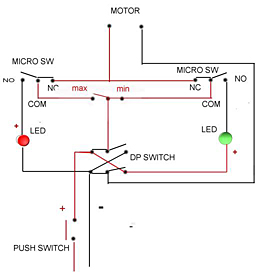
Assembly first starts with the capacitor and motor, this is the important part of the magnetic loop. Get the strip of paxolin and mount the capacitor at one end (top). Fit the insulated coupling to the capacitor shaft and then fit the reduction gear. The brackets will need to be made from 4mm aluminium. Then make up a bracket for the 2 micro switches.

 image016-1image019-1

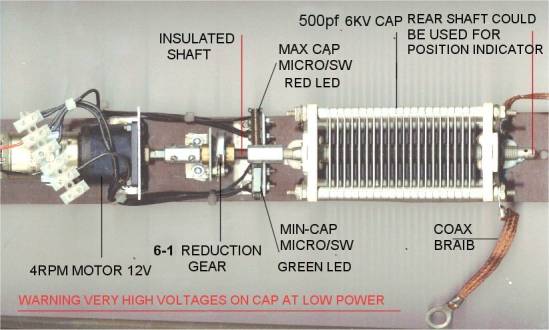
They have to be set as to use the flexible coupling with a long 4mm screw in one of the holes for switching at min/max capacitance, see photo and wiring diagram. Next the 100mm /300mm plastic drain pipe (length to suit cap/motor) fits the bottom section of top plug with pvc. Glue and drill 2* 25 mm + holes 30mm down from top of pipe with the holes opposite one another for the 25mm copper pipe to be inserted in about 25mm. Then bolt cap/motor assembly into pipe. Connect capacitor to copper pipe with coax braiding and 6nmm brass bolts. Get the bottom plug fit the 25 mm coupling and the din socket connect to motor and fit with self-tapping screws and sealant on main pipe. Assembly of capacitor is now complete. Fit broom handle to coupling, I use this as the mast, also to attach the coupling loop with cable ties.

image013

Assembly of the Loop:
4*1.5 mtrs 22mm copper pipe. Take 1 length cut 30mm of the length the pipet in half — this is the top portion of  the loop. Clean the pipe and bends with wire wool and add flux. Then fit bends to pipe. Do this on flat surface and fix bends with self-tapping screws till you solder. You now have a square loop. Paint if required.
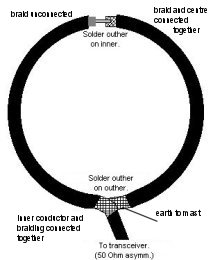
Coupling the Loop:
Coupling loop should be about a 1/5th size of main loop made from RG58U COAX but I always make it bigger. Then trim it by 15mm at each end till you get a 1-1 match (see photo). Then solder And seal with rubber tape.
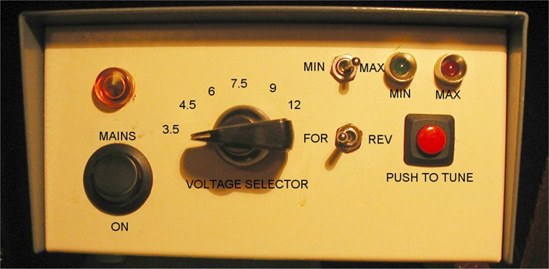
image018Power supply:
I use small power supply unit you can buy for calculators/portable radios 3/4.5/6/9/12/volt at 1 amp — they are ideal for the small 12V motor. I built mine into a small box with the switches and the LEDs work well. There are more sophisticated control circuits that can be used but this was the easiest.


This article was available at http://www.standpipe.com/w2bri/article2.htm

Leave a Reply

Your email address will not be published. Required fields are marked *

This site uses Akismet to reduce spam. Learn how your comment data is processed.

IW5EDI Simone

  • Licensed Amateur Radio operator in 1996 as IW5EDI, active member of ARI Firenze and ARRL
  • Class 1970, married with two childrens, love experimenting and antenna home-brewing. IT System Engineer, recently started having fun with morse code and Raspberry Pi


IW5EDI Simone


This Blog is mainly dedicated to Amateur Radio (Ham radio) and contains external articles and personal esperiences.

What is Amateur Radio ?
More Ham Radio Links


Blogroll

  • ARI Italian Amateur Radio Society 0
  • ARI Firenze ARI – Sezione di Firenze 0
  • ARRL Amateur Radio Relay League 0
  • DX Zone Ham Radio Internet Guide 0
  • DXSummit 0
  • DXWatch 0
  • eHam 0
  • Ham Radio Daily Ham Radio News 0
  • IW5EDI on QRZ.com My page on QRZ.com 0
  • Long Delayed Echoes 0

My Content

  • Antenna Projects 0
  • RadioAnnunci.it Mercatino Radioamatoriale 0

Categories

  • Articles (131)
    • Antenna Theory (13)
    • DXing (2)
    • How to (10)
    • shortwave (7)
  • Company and Products (1)
  • DXing (13)
    • QSLing (4)
  • Equipment (97)
    • Antenna (65)
    • Software Defined Radio (6)
  • Featured (28)
  • Ham Radio Events (25)
  • Ham Radio News (1)
  • Ham Radio Software (26)
  • HamRadio (94)
    • Ham Radio 2.0 (16)
    • How to (6)
    • Radio Scanning (6)
  • Homebrew (142)
    • HF Antennas (78)
    • Raspberry Pi (1)
    • UHF Antenna (16)
    • VHF Antennas (38)
  • Photos (4)
  • Short News (4)
  • Video (4)

Comments

  • Charles Mintoff on Ham Radio 2012
  • Roger Sparks, W7WKB on Petlowany Antennas by K6NO
  • Frank Barnes on Ameritron AL-80A restoration project
  • ken m3zkb on W5GI Mystery Antenna
  • Bobby on 5/8 Vertical Ground Plane antenna for 10 meters

RSS The DXZone.com

  • Top Amateur Radio Websites - Issue 2603
  • FT2: New Ultra-Fast Digital Mode Tested on HF
  • Top Amateur Radio Websites - Issue 2602
  • The G3LZR Tribander : The charm of the Impossible Antenna
  • Top Amateur Radio Websites - Issue 2601
  • Amateur Radio Clubs
  • Shrunken Quad
  • DIY Magnetic Loop Antenna Tutorial with Remote Tuning System
  • HF Beacon Tracker: Real-Time 3D Propagation Visualization
  • WSJT-X FT2 fork Decodium

Ham Radio Blog – IW5EDI Simone JN53OR

© 2026 IW5EDI Simone – Ham-Radio | Powered by Superbs Personal Blog theme